Three Bollinger Scalp
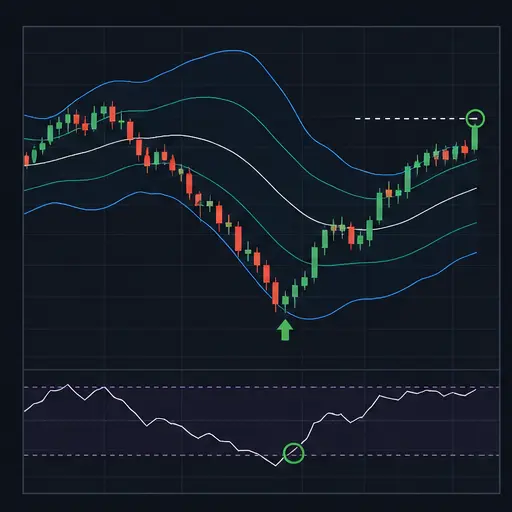
Three Bollinger Scalp looks for short-lived price extremes using three Bollinger Band envelopes calculated from the same middle line. The inner, middle, and outer envelopes form zones rather than a single “price crossed a band” trigger.
The strategy buys when price reaches a configurable depth between the inner and middle lower bands, without moving beyond the outer lower band. It can then exit at a fixed target, the Bollinger middle line, the first of those two levels, or a profitable upper-band reversal.
This is a mean-reversion strategy. It is designed for markets that repeatedly stretch away from a stable average and recover. It is not designed to keep buying an accelerating sell-off.
warning
Small mean-reversion targets can disappear after spread, fees, and slippage. Test the exact pair, exchange, period, and fee rate you intend to use. An optional stop is available, but it is disabled by default.
How the three bands work
All three envelopes use TBB_BB_LENGTH for their middle line and volatility measurement. Their deviation settings determine how far each envelope sits from that average:
- The red band is the inner envelope.
- The orange band is the middle envelope.
- The yellow band is the outer envelope.
With the defaults, red uses 2 standard deviations, orange uses 3, and yellow uses 4. The bands should remain ordered from narrowest to widest. In normal use:
TBB_RED_DEVIATION < TBB_ORANGE_DEVIATION < TBB_YELLOW_DEVIATION
The strategy uses the red-to-orange space as its entry zone. The yellow band limits how far outside the expected range a candle may travel and still qualify.
Entry behavior
TBB_ENTRY_DEPTH selects a point between the lower red and lower orange bands:
0places the threshold at the red band.0.5places it halfway between red and orange.1places it at the orange band.
The candle low must reach that threshold, but it must not fall below the outer yellow band. Increasing the depth therefore demands a larger downward stretch before entry. It usually reduces the number of trades and seeks a better entry price, but it can also select more forceful declines.
When TBB_REQUIRE_RETRACE_CLOSE is enabled, the candle must also show some recovery: it must either close above its open or close back above the lower red band. This filter helps avoid entries on candles that only continue falling.
The strategy holds one position at a time and does not average down.
Exit modes
TBB_EXIT_MODE controls the primary profit target:
middleaims for the Bollinger middle line. If that line is not above the entry, the configured fixed target is used instead.pipsalways uses the configured fixed distance. Despite the label, this distance comes fromTBB_TARGET_PIPSin pip mode andTBB_TARGET_PCTin percentage mode.firstuses whichever valid target above the entry is closer: the middle line or the configured fixed target.
The selected target is established when the position opens. It is also raised when necessary to cover estimated round-trip fees and TBB_MIN_NET_GAIN_PCT.
TBB_EXIT_ON_UPPER_EXTREME adds another possible exit. It looks for price to reach a configurable depth between the upper red and orange bands, while remaining below the upper yellow band. With retrace confirmation enabled, the candle must show a retreat from that upper area. This signal sells only when the position has reached the strategy’s fee-aware profitable level.
Protection and maximum holding time
Enable TBB_USE_PROTECTION to activate the price stop. The strategy uses TBB_STOP_PIPS in pip mode or TBB_STOP_PCT in percentage mode.
TBB_MAX_HOLD_MS can close a position after a maximum age, but it is also part of the protection system. It only operates while TBB_USE_PROTECTION is enabled. Set it to 0 to disable the time limit.
Unlike the upper-extreme exit, a protective price stop or time stop can realize a loss. This is their purpose: they define when a failed mean-reversion trade should no longer remain open.
Good market conditions
Three Bollinger Scalp is most at home when:
- the market is liquid and spreads remain consistently small;
- price oscillates around a reasonably stable average;
- Bollinger Bands are wide enough to offer usable movement, but not expanding violently;
- downward extremes often retrace instead of developing into sustained sell-offs;
- the selected target is realistic after fees and slippage.
A good example is a range or gently rising market with repeated lower-band wicks followed by recoveries toward the middle. A lower-zone touch that occurs after an orderly stretch is generally more suitable than one caused by a sudden collapse.
Use extra care when the middle line is falling steeply, the envelopes are rapidly expanding, or price repeatedly rides the lower band. Those conditions can indicate a directional downtrend rather than a temporary deviation. Very narrow bands can also generate signals whose available movement is too small to cover costs.
Creating the strategy
Create a spot strategy and choose Three Bollinger Scalp as the buy and sell method. Start in backtesting or paper trading.
A useful first setup process is:
- Choose a liquid pair and inspect its normal spread.
- Keep the default 2/3/4 deviation structure initially.
- Decide how deep price must enter the red-to-orange zone.
- Keep retrace confirmation enabled until tests show a reason to remove it.
- Compare
first,middle, andpipsexit behavior. - Decide explicitly whether the position needs price and time protection.
- Test trending declines as well as favorable ranging periods.
Strategy settings
Trading and order size
| Setting | Description |
|---|---|
BUY_ENABLED | Enables new buy orders. Disable it to stop new entries. |
SELL_ENABLED | Enables strategy sell orders. Disabling it prevents normal and protective strategy exits. |
PERIOD | Candle period used for the Bollinger calculations and signals. |
TRADING_LIMIT | Compatibility fallback only. It is ignored while the strategy-specific trading limit contains a positive value. Configure the strategy-specific setting for normal use. For USDT-BTC, this value is in USDT. |
TBB_TRADING_LIMIT | For USDT-BTC, the amount of USDT this strategy attempts to use per entry. |
FUNDS_RESERVE | For USDT-BTC, the amount of USDT the bot must leave unused. |
KEEP_QUOTE | For USDT-BTC, the amount of BTC the strategy must not sell. |
MIN_VOLUME_TO_BUY | General minimum value for a buy order. For USDT-BTC, this value is in USDT. |
MIN_VOLUME_TO_SELL | General minimum position value for a sell order. For USDT-BTC, this value is in USDT. |
TBB_MIN_ORDER_VALUE | Strategy-specific minimum buy value. For USDT-BTC, this value is in USDT. |
TBB_MIN_SELL_VALUE | Strategy-specific minimum sell value. For USDT-BTC, this value is in USDT. |
Orders must also satisfy the exchange’s minimums and available balance.
Timing, spread, and entry blocking
| Setting | Description |
|---|---|
TBB_COOLDOWN_MS | Minimum time in milliseconds between strategy actions. |
TBB_ENFORCE_COOLDOWN_IN_BACKTEST | Applies the same cooldown during backtests. Keep this enabled when you want timing behavior closer to live use. |
TBB_MAX_SPREAD_PCT | Maximum allowed bid/ask spread as a percentage. |
TBB_MAX_SPREAD_ABSOLUTE | Optional maximum spread in USDT for a pair such as USDT-BTC. 0 disables this absolute limit. |
TBB_NEWS_BLOCK | Manually blocks new entries. Existing positions can still be managed. |
TBB_NEWS_BLOCK_UNTIL | Keeps new entries blocked until the configured time. |
The percentage and absolute spread checks are both enforced when the absolute limit is non-zero. Absolute values are pair-specific: the same number is not appropriate for assets with very different prices.
Bollinger zones and signals
| Setting | Description |
|---|---|
TBB_BB_LENGTH | Number of candles used for all three Bollinger envelopes. Higher values create a slower, smoother reference. |
TBB_RED_DEVIATION | Width of the inner envelope in standard deviations. |
TBB_ORANGE_DEVIATION | Width of the middle envelope. Keep it above the red deviation. |
TBB_YELLOW_DEVIATION | Width of the outer boundary. Keep it above the orange deviation. |
TBB_ENTRY_DEPTH | Entry threshold between the red and orange bands, from 0 to 1. |
TBB_REQUIRE_RETRACE_CLOSE | Requires the signal candle to show recovery from the lower zone; it also asks upper-extreme exits to show rejection from the upper zone. |
TBB_EXIT_ON_UPPER_EXTREME | Enables profitable exits after price reaches and rejects the corresponding upper zone. |
If the deviations are entered out of order, the intended inner/middle/outer zone logic no longer represents a conventional three-band structure.
Profit target
| Setting | Description |
|---|---|
GAIN | General gain fallback retained in the configuration. The strategy normally uses its TBB_ target controls. |
TBB_EXIT_MODE | Selects first, middle, or pips target behavior. |
TBB_USE_PIPS | Uses pip distances instead of percentage distances for the fixed target and stop. |
TBB_PIP_SIZE | For USDT-BTC, the USDT value represented by one pip. |
TBB_TARGET_PIPS | Requested fixed target in pips. The strategy constrains it to the configured minimum and maximum. |
TBB_TARGET_PIPS_MIN | Lowest permitted pip target. |
TBB_TARGET_PIPS_MAX | Highest permitted pip target. |
TBB_TARGET_PCT | Fixed percentage target when pip mode is disabled. |
TBB_MIN_NET_GAIN_PCT | Additional minimum intended gain above estimated fee break-even. It can raise the effective target. |
The minimum and maximum pip settings only constrain TBB_TARGET_PIPS; they do not create a dynamic target range. If you enter a target below the minimum or above the maximum, the nearest boundary is used.
Protection
| Setting | Description |
|---|---|
TBB_USE_PROTECTION | Enables both the configured price stop and, when set, the maximum holding-time exit. |
TBB_STOP_PIPS | Stop distance in pips when pip mode is enabled. |
TBB_STOP_PCT | Stop distance as a percentage when pip mode is disabled. |
TBB_MAX_HOLD_MS | Maximum position age in milliseconds. 0 disables it; a positive value requires protection to be enabled. |
Backtesting range
| Setting | Description |
|---|---|
BF_SINCE | Start of the backtesting period. |
BF_UNTIL | End of the backtesting period. |
DEEP_TESTING | Enables the deeper backtesting mode available in the editor. |
Practical tuning directions
For fewer, deeper entries, increase TBB_ENTRY_DEPTH. For earlier entries, move it toward 0. Do not assume that deeper is automatically safer: in a strong downtrend, a deeper touch can simply reflect stronger selling.
For a conservative confirmation, keep TBB_REQUIRE_RETRACE_CLOSE enabled. Disabling it makes the low-zone touch sufficient and can enter before the candle demonstrates any recovery.
Use first when you want the nearest realistic recovery objective. Use middle when the strategy should primarily trade a return to the average. Use pips when you want a consistent fixed-distance objective independent of the middle line.
Shorten TBB_BB_LENGTH for a faster-moving envelope and more responsive zones. Lengthen it for a steadier reference with slower signals. Any change should be retested with the deviation structure and chart period, because these controls shape the same bands together.
Important limitations
- Bollinger extremes do not guarantee reversal.
- The strategy can buy only one qualifying lower-zone candle; it does not scale into a continuing decline.
- The outer yellow band blocks candles that move beyond it, but price can still continue falling after a valid entry.
- Upper-extreme exits require sufficient profitability and are not loss exits.
- Time exits do nothing unless protection is enabled.
- Very small fixed targets may be raised by fee and minimum-gain requirements.
- Backtests cannot perfectly reproduce live spread, slippage, latency, or liquidity.
The strategy is most useful when its three envelopes describe a repeatable trading range. If the bands are primarily documenting a strong directional collapse, waiting for better conditions is often more important than tuning the entry depth.